Showing posts with label Charlotte. Show all posts

Friday, April 5, 2013

Pinspiration: Chalkboard Pallet Shelf

 
This week's post is brought to you by a friend of ours. Rikki runs Day of Diva, which is an event coordination business. Basically, she helps in the month of your wedding and makes a time line for the flow of the wedding, does rehearsal the week of and manages the staff and vendors the day of to make sure that your wedding day runs perfect! She basically prevents you, the bride, from going crazy or throttling any and all of your wedding party and vendors.


By trade, Rikki is an event coordinator, but on any other day when she is not working, she is a bundle of crazy, artistic, sarcastic, ball of energy. She lives in Ventura , Ca and is married to a hottie. We are still friends even though she has a cat. I've known Rikki since the 2nd grade and we used to sing Benny and the Jets together. I think that's all you really need to know.


~Charlotte

From Rikki:

Chalkboard Pallet Shelf

Here are some very simple instructions on how to make a "pallet" shelf. This cost me a total of $22.00 but the feeling of pride in myself for actually making something off Pinterest was priceless, LOL.


Wednesday, April 3, 2013

The Do's and Don't of Maternity Clothes: As Told by Looking at Kim Kardashian vol. 1

 
As you all know, Kim Kardashian and Kanye West, more affectionately (or annoyingly) known as Kim-ye, are having a baby. Very few celebrity pregnancies, not just the babies, have been as highly scrutinized as the pregnancy of Kim-ye.
 
The gurl obv has some sort of style or she wouldn't be where she is today, a fashion mogul (or disaster, depending on how you look at it), and don't forget she has been married two times over not to mention linked to numerous "famous" menz.

With all the extra scrutiny from the public right now, you would think Kim would have grabbed herself a professional stylist, or, if she has one right now, fire them and get a new one.

Let's start off with my favorite Kim maternity fashion "Don't" simply because there are more of them to choose from and they are much more fun.
 
Why this look doesn't work: The shape is horrible. The cut is horrible. The placement of the color blocking is horrible. The hair and makeup are too severe...Out of ten stars, I give this a rating of "Shoot me now". 
 
Who Wore It Best?

There are so many questions that need to be answered here such as:

Tuesday, March 26, 2013

ModCloth Maxi Madness

It's that time of year again where Maxi dresses are back "in", but were they really ever "out"? Well considering I never dress according to what is "in",  this point is null and void...That being said, my lack of fashion sense doesn't make theses dresses any less cute. They can all be found on ModCloth and are all under $100. If you spend over $50, you get FREE shipping, and as an added bonus, New Members can use this link to get $15 off of a $50 purchase! Don't forget you can shop through e-bates or fat wallet to get extra cash back!
 

Romantic Maxi Dresses
Shakespearean in the Park Dress $69.99
Dandelion Dining Dress $89.99
Brunch By the Falls dress in Royal Blue $49.99
Wake Up and Style Dress $92.99


Pretty in Print Maxi Dresses
As a Matter of Refract $84.99
Burst of Brilliance $52.99
Pretty Polly Dress $89.99


Striking in Stripes Dresses
Feel It in my Tones $49.99
Shades of Paradise $59.99
Breezy Street Dress $47.99
At the Helm Dress $52.99

Friday, February 15, 2013

DIY: Water Bottle Labels


My daughter's birthday just passed I really wanted her party to be memorable. I wanted people to be able to take something home from her party or see something that stands out! I've seen  personalized water bottle labels at many parties and thought that one day I will do them. Well ,today is that day!

You can buy pre-made templates from sites like Online Labels, or  personalized labels &/or templates from sites like Etsy, but I'm going to do this the cheapest way possible!

DIY: Water Bottle Labels
What you will need:
*Strips of paper 1 3/4″ tall x 8 1/2″ wide. It can have a custom design from your computer, or you could even use decorative/scrap booking paper.
*Clear 2" Packing tape
*Bottled water, the smoother the bottle, the better.
Instructions:
1. Remove original labels from water bottles.
2. Lay your pre-measured and cut label out on a flat stable surface. Next pull out a piece of  tape just slightly longer than your paper. If done correctly, you should have just a little bit of tape above and below your paper to help adhere the label to the bottle; and a little bit on each end for extra security.
3.Press the tape as smooth as possible onto the paper, careful not to move the label or get air pockets in the tape if at all possible.
4.Pick up your label and line it up as straight as possible along the side of the bottle where the original label was and apply slowly.

I would like to mention that I have yet to test the "waterproof-ness" of these labels.  I recommend just keeping them chilled in the refrigerator as I haven't experienced any problem with basic condensation but I have not yet tried  throwing them in a cooler or bucket of ice. If you try it, let us know how it works!

Here is my finished product!


and don't forget,


Thursday, February 14, 2013

Valentine's Day Looks


Valentine's Day means different things to all of us. For some it might inspire a hearty, "F U!", for others it's all romantical boner city. Whether you've got a hot date with a sexy significant other, or you're just going to eat an entire box of Choco Tacos alone, you might want to throw on something cute. We thought it might be fun to get a few of us ladies to put together their dream Valentine outfits to share. And because I love all of you, I'm going to include the notes I wrote when I started writing this blog... enjoy.

Hearts, hearts, hearts, F U, blah, blah, blah. Tom Hardy lady boner, and Alexander Skarsgard dong dance. 


Wednesday, February 13, 2013

DIY: Candy Wrapper Labels


These labels are fun for any occasion and would even be perfect for the quickly approaching Valentine's day! I happen to have made them for my daughter's Disney "Brave" ("If ye had the chance tah change yer feht, woodjhur?") themed party. Has anyone else seen this movie? I had to watch it 2-3 times to understand most of what they were saying...I get it, you're Scottish. 

Anyways, I found templates online that you could buy, or very specific free printable templates, but no instructions on how to make your own.

Here are some basic instructions so you can make them yourself :

1.Using Microsoft Word, make a rectangle approximately roughly 5.25 x 5.5.
This will be cover a standard 1.55oz candy bar.


2. Using Word Art , clip art, pictures, and additional text boxes, personalize your wrapper for the occasion.

3. Once printed, cut around the solid lines of your rectangle, this will be your wrapper.

4. Fold the wrapper over the candy bar. You can fold it over the original wrapper, or do like I did, (like a nut), wrap the already wrapped candy in foil for a sleeker look, and apply
your label over that. 

5. You can use scotch tape, double sided tape, or glue to adhere the label.

Pictured above is my candy wrapper label and a personalized water bottle label I made as well.
  

Wednesday, December 19, 2012

Gifts for Teachers


Hay gurl, long time no blog. I'm back and better than ever with a new baby, a few extra pounds, and tons to say! I've got to work my way back into my blogging mindset. This first post back is going to be short and to the point because frankly, the only interaction I've had for the last few months has been with a 2 yr old and a newborn...

So of all things to post, why a teacher post? Well, I've found that my circle of "Mommy Friends" is growing faster than my waistline during the holidays. It seems that recently, many of them have been asking "What should I get my kid's teacher for Christmas?" and the traditional response seems to be candy and a gift card...BOR-ING! If you have the time and the drive, I have found a few great ideas through other blogs and of course, good 'ol Pinterest.

1. Gift card.

If you're going to do a gift card, do it the right way. Get as many people as you can involved in it, perhaps a gift from the whole class, and make a "Gift Card Tree"! Everybody buys a different gift card in whatever denomination and attach it in a fun artsy fartsy way to a (real or fake) tree, wreath, or stand! Check out these pics below for some inspiration!


2.  Gifts that Give back

What do you get for the teacher that has everything? Buying Bracelets=Educated Kids.
"Utilizing remnants of Zulugrass, Maasai artisans are designing one-of-a-kind bracelets to symbolize the bright futures of educated children. The Leakey Collection will donate 100% of their profits from the sales of these bracelets to pay for teachers' salaries in rural Kenya. Each 26" bracelet is wound 4 times and packaged on a specially designed color story card. Purchasing 5 bracelets pays for a teacher's salary for 1 day."
Available via Leakey Collection 


3.  Themed Gift Baskets:

For the teacher who loves movies:  Grab a couple fun DVDs, add some microwavable popcorn, and don' forget the candy! If they are an awesome teacher, add a gift certificate to the movies!

For the teacher who deserves to be pampered:  You can make your own "spa package" for a mani/pedi including nail polish, nail tools, pumice stone and lotion. You can also make a skin "spa package" and include a store bought or home made body scrub, lotion, face mask, bath bubbles and loofah!  To go the extra mile, add a gift certificates for a massage, manicure and/or pedicure!

For the teacher who loves to read: Pick up the latest best-seller, a magazine subscription and add a book light or even a homemade bookmark! Feeling extra generous, again, add a gift card to your local bookstore and voila!


If you have any other ides, please leave a comment here or share on our Facebook page! Happy Holidays!

Thursday, October 4, 2012

Zany Zucchini

I had a love affair this summer...with a vegetable. No you perverts, not like that. I am not the gardener of the group, nor do I pretend to be. Every time I plant something, I have to call Heather and her gardening boyfriend to make sure I'm doing it right, how to prune it, is it edible etc. I think mostly to stop or at least slow the flow of my stupid questions, they finally suggested I plant an (almost) idiot-proof plant, zucchini.
 
Fast forward a few weeks when my first zucchini sprouted and I called anyone who cared, and even those who didn't care. I put it on Facebook and Instagram, I even considered paying to put up a billboard to proclaim my awesomeness.
 
But what no one told me is that approximately every 45 seconds, a new zucchini grows. I had zucchinis coming out the wazoo...seriously. I took them to work, forced them on unsuspecting family members, left them on strangers doorsteps, and even cooked with them every.single.night.(sorry husband Jon).
 
 
Zucchini really is the best and easiest Summer vegetable to grow. I made so many things I felt like a culinary artist. Here is a quick breakdown of some of my favorite recipes.
 
Zucchini Boats:
 
 1) Pre heat oven to 350
2)Cut medium size zucchinis in half lengthwise
3) Scoop out the seedy innards
4) Make a mixture of what you would like for the filling. I used 1 lb. ground beef, a dash of Italian seasoning as well as garlic salt and onion powder. Simmer together until brown then drain.
5)  Mix beef with 1 c. Parmesan cheese, 1 c. cheddar cheese (we like cheese), bread crumbs and home made tomato sauce then fill the boats with mixture.
4) Line baking dish with foil and cook for 30 minutes or until golden brown.
 
Zucchini Lasagna:
 
 I followed this recipe exactly, and this dish came out amazing! No one could believe that I didn't use any pasta in this "lasagna"!
 
Italian Zucchini Chicken:
 
 
This recipe is obviously the easiest of them all. I simply baked 6 chicken tenders in Italian dressing for 25 minutes at 350 then I threw in sliced Zucchinis with the chicken for 15 more minutes. Make sure the zucchinis are covered with dressing or they will dry out!
 
There are tons more dishes that you can make with zucchini, all you have to do is look or be the slightest bit inventive in your kitchen! My favorite recipe was "Zucchini fries". They were actually so good that the two times I made them, I didn't even have a chance to take a picture of them before they were all gone. If you can think of any yummy or unique zucchini recipes feel free to post them on here or our FB page!

Thursday, September 27, 2012

Pinterest Banana Boats


I originally saw these amazing looking things on Pinterest (of course), and tracked them down to the Lick My Spoon blog. In my excitement (and being in my ravenous pregnancy hunger mode), I didn't really pay attention to any of the instructions and made them how I wanted to.
 
Instructions:

1. Choose your bananas wisely. I sent my husband to the store and he bought barely ripe ones. You     will want to pick up the ugly old lady ones...you know, the one with brown spots (but not too many spots, and not mushy).
 
2. Slit the bananas lengthwise and stuff them with any combination of toppings that you (and the little fat kid inside of you) desire. I used chocolate chips, peanut butter chips, chopped almonds, and sprinkles!
 
3. According to Lick My Spoon, you should wrap the bananas in foil and place on the grill.  Next, grill with the cover on until toppings get melty and delicious. I opted not to do this and it may have made a difference. I didn't wrap them, I just placed them on a sheet of foil on the grill so I could watch them. Per other websites, if you are not wrapping them in foil, they are most likely done when the center is gooey and the peels are black...The middle didn't get as gooey as I would have liked, but they were still pretty yummy!
 
 
4. Eat right out of the peel with a spoon or scoop out and eat it with ice cream! Mmmm!!!! I had a picture of me eating one, but I decided not to post it. I can assure you it looked something like this though, just add bananas....
 
Ice Cream Makes Me Angry!

The End.

Tuesday, September 18, 2012

Trendy Mommy Tuesday's: vol. 13


It's been a long time since I've posted any trendy mommy posts, but I have been really busy! I am finally on maternity leave and catching up on all of the little things I need to do before my bebe Kenny gets here! Now that I am 39 weeks, I am finally sitting down to crank out some articles for you all. This post is going to be short and to the point.

My trendy  mommy this week is Pink (and her daughter Willow) as seen in People Mom & Babies online! I not only love Pink as an artist, but she is so fit, beautiful, headstrong, and unique in every sense of the word that I love writing about her! That's either my motherly hormones gushing out my borderline inappropriate love for her or a secret lesbian crush that I had no idea I was harboring...Either way, here is my fashion breakdown this week...

Recreating Pink's Outfit !


L to R:
 
 
And just for fun, here's a toddler girl's version of the same outfit because it's so darn cute !


L to R:


So that's today's lesson on how to dress like Pink, and when I figure out how to look and sing like her I'll let you know...actually I won't, I'd keep that secret to myself.

Thursday, September 6, 2012

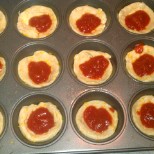
Muffin Tin Mini Pizza

Pinterest will be the death of me...literally. I am quite sure while I am on Maternity Leave I will make something (not of the healthy variety, more of the delicious fatty variety) every night until I am morbidly obese a la Gilbert Grape's Mom. One of the things recipes which has struck my fancy not only because it looks yummy but because it seems easy, is "Pizza Muffins". Although it seems to have been a Pinterest mystery link, I finally found  a source on the "All My Great Ideas Are Really From Pinterest" blog.


I'm sort of about using what I have in the house to cook or bake so I didn't follow her directions 100% but my Mini Muffin Tin Pizzas were still yummy! Luckily the hubby is still on his Atkins diet so we had cheese, and pepperoni of all shapes and sizes on hand. And luckily I'm a fatty and love bread so we had Pillsbury refrigerated biscuits in the fridge as well.
 
Directions:Preheat oven to 325 degrees (as the package directed on biscuit dough vs pizza dough) and grease your cupcake pan.

Push the dough into the molds and try to make the dough cover the sides. I used one biscuit per tin and had two left over which I dispersed among all the tins. Next cover the dough with sauce, cheese, and pepperoni.


Bake for 10-15 minutes but keep an eye on them especially if you are using the biscuit dough instead of the pizza dough because they will rise quickly!
 
I used mini and regular sized pepperoni (hey, I like pepperoni) and tons of cheese so the muffin tin came out of the oven a little...uh...ugly.
 
 
Once I separated them from each other, they were much cuter and super delicious!


These are fast and easy to make and usually everyone in the house is happy with it! I mean seriously, who doesn't like pizzas?? Has anyone else tried this or made any other variations they want to share? If so, leave a comment below or find us on FB, or Twitter. If you're a Pinterest fiend like I am, come and follow  Whoreders on Pinterest as well as myself!

Tuesday, September 4, 2012

Birthday Freebies!


An update on How to Spoil Yourself on Your Birthday !


Visit all of these links and sign up for the free stuff you deserve! Because we know that there are more people out there that want to pamper and dote on you, we recommend that you check out all of your local eateries and shops for possible birthday freebies and/or e-mail clubs. Like Heather said in her birthday post  that even though "a few of these are specific to my area, [I realized] that all of you should look up your fav local eateries and mom and pop stores to see if they have a sign up sheet for an account, rewards program, or mailing list. If they ask for your birthday on the sign up there's a good chance they'll send you something, even if it's just a shopping discount! Hey, I like discounts, too! "

Acalpulco E-Club - Free Entree

AMF Bowling Club - Free Bowling

*Anthro -$10 Coupon and a cute little carrying case!

*Applebee's - Free dessert

Arby's E- club - Free Birthday Surprise (Roast beef I'm guessing...)

Atlanta Breads - Free Cookie (none in CA)

*Auntie Anne's - BOGOF Pretzel

B

Barnes & Nobles Kid's Club - Free Cupcake for your child on their birthday!

*Baskin Robbins - Free scoop of Ice Cream

*Baja Fresh - Free Taco @ sign up and Free burrito on your birthday!

bd Mongolian Grill - Free birthday surprise (No West Coast locations)

*Ben & Jerry's - Free Ice Cream

Benihana - $30 Gift Certificate !

*BJ's Brewery - Free Pizookie

*Black Angus - Free appetizer w/ purchase of an entree & the same offer on your "sign up anniversary"

Bob Evans - Free kid's meal on your child's birthday (Midwest & East Coast only)

The Body Shop - Initially you PAY $10 for a yr BUT free birthday gift and one free item a month along with special sales and discounts for card holders only

Buca di Beppo - Free Brownie

Thursday, August 30, 2012

Crockpot Tortilla Soup

So the other day my pregnant brain was on Pinterest, and it was hungry. The first thing to catch my eye was the picture below which links to a very simple, easy to follow, not to mention yummy recipe for CrockPot Tortilla Soup originally pinned from Miller Musings!


CROCKPOT CHICKEN TORTILLA SOUP
 

2 boneless skinless chicken breasts
*Fresh is best but I used frozen and it came out great!
2 cans  Rotel
*Original chef prefers lime & cilantro, but I used Rotel w/ Green Chilies.
1 can black beans, rinsed and drained
1 can kidney beans, rinsed and drained
1 can corn
1 onion, chopped
*I only used half of a large one and it was more than enough.
2 cans low-sodium chicken broth
*I used regular for more flavor.
1-2 cups of water
*I only used 1 1/2 cups because I figured of the extra water in the frozen chicken breasts.
1 Tbsp garlic powder
*I used 2 Tbsp, I LOVE garlic!
1 Tbsp chili powder
*Again, I used closer to 2 Tbsp for extra flavor.
1 Tbsp ground cumin
1 Tbsp dried cilantro
*I personally don't care for cilantro so I left this step out but I hear it's delicious...
Tortilla chips
Sour cream
*Optional for a topping after soup is finished.
Shredded cheddar or Mexican blend cheese.

*Note about the spices: Instead of the spices listed, you could include a packet of Taco seasoning if you prefer or if it easier or less inexpensive for you. I happened to have all of these spices on hand...*

Per Miller Musings; "Put chopped onion, cans of [rinsed] beans, rotel, corn, chicken broth, water, and spices into the CrockPot and stir to mix. Put chicken breasts on top of mixture and make sure they’re at least partly submerged in liquid. Cook on high 6-7 hours or low 8-9 hours. Before serving remove the chicken breasts from soup and shred, if needed, (sometimes they’ll just fall apart on their own, but sometimes they need some help). Return chicken to CrockPot, stir to combine."


To serve, you can put a few tortilla chips in the bottom of a bowl, ladle soup over tortilla chips, top with shredded cheese, and a sour cream if that's your thing. I like to serve it with chips or tortilla chip strips on top so they don't get soggy! And Voila, delicious but most importantly EASY Tortilla Soup!

Wednesday, August 15, 2012

Target Clearance Time!


So we don't often post about specific sales in blog form, but I seriously can't help it this time. I went to Target last night and had every intention of running in and out in ten minutes top (don't we all?) But it didn't go down like that. I left the house before 8 PM and got home a little after 10 PM, it was like I got sucked into an alternate universe and lost track of time. It's not like I have never lost track of time in a Target before, but this was like Twilight Zone episode of Target shopping; full of crazy prices, insane managers, and absurd customers (myself not included obv.)
I walked in to Target with my game face on and made a beeline for the wine section, no I am not a fan of fetal alcohol  syndrome, it was for a friend (that sounds believable right?) Directly after the wine, I went to the children's section to look for a present for party this weekend. That's where I made my fatal error. It is impossible to go to the toddler section without cutting through the baby section first and the Baby Clearance as well. There was SO MUCH CLEARANCE. It began with the Fisher Price Snugabunny Collection  which is on "Clearance" right now. The Rock N Play Sleeper and Bouncer are now $45.48 each instead of the normal in store price of $65 (30% off). They have a matching swing on clearance as well but for some reason I didn't get a picture but it is originally around $150 and on sale for $105 (also 30% off).


Since this stuff was on sale, and I was already basically IN kids clothing, off I went...that was my second mistake. There were at least 6 rounders, front and back full of clearance that was at least 30% off. There is a ton of Mini Harajuku on clearance. The ones below are regular price online but 50%-75% off in store! There is so much more marked down but I have to stop here, but seriously if you have kids GO RIGHT NOW.


My next stop logically was toys. I found a Momma & Zooblings Zoobles playset $22.49 (online price) only $7.49 in store, as well as Little People Batgirl & Wonder Woman Duo $6.99 clearance for $2.49, and Crayola 3D Chalk Set $9.99 clearance for $2.49.


After the toys, I stumbled haphazardly around the store in savings induced stupor raiding all the clearance endcaps. There was clearance in every.single.department. My most random find of the night was a toss up between the Jack LaLanne juicer $109.99 in store ($99 online) on clearance for $54.98 and the
Remington Shine Therapy Conditioning Straightener $49.99, clearance for $24.99 !

This is not where my story ends, but this is where I will stop writing. Seriously though,  Target has everything marked down right now: food, cosmetics, pet supplies,bags & bows, clothing, homed ecor, candles, gardening items, accessories, games, movies, etc. I shopped so hard that I broke a sweat. So go forth my Whore(der)s and break a sweat.  

Wednesday, August 8, 2012

Welcome to My New Obsession: Pinterest


Once upon a time there was an addictive website called Pinterest. The end. No seriously, it was the end of me. Remember when you were younger and you loved tearing articles, recipes, and pictures out of magazines? Some of us would make a collage or decorate our room, others would put them in photo albums and make books. Most of these were things we wanted to do, be, or make. Simply put, they were the things we lusted after.

Pinterest has brought this obsessiveness to a whole new level by adding technology up in the mix. "Pinterest lets you organize and share all the beautiful things you find on the web. People use pinboards to plan their weddings, decorate their homes, and organize their favorite recipes. Best of all, you can browse pinboards created by other people. Browsing pinboards is a fun way to discover new things and get inspiration from people who share your interests. To get started, request an invite. "

As soe of you may know, my world is currently full of pregnant women, including myself, my sister-in-law, and my sister. When I found out I would be throwing a baby shower for my Sister-In-Law, and then shortly after that one for my Sister, my first thought was Pinterest! Oh goody, a chance to be the super crafty woman in real life that I pretend to be online! My sister-in-laws baby shower was this passed weekend and flew by in a crazy whirl of Pinterest inspired pink and zebra decor and dessert. 

1) Mini Cupcakes: Here are my Mini-Cupcakes in condiment cups found on Pinterest, originally from Matthew Mead. They are super easy and super cute. I just grabbed a bunch of ketchup cups from a local fast food joint , some funfetti cake mix and Betty Crocker spray cupcake icing. Make sure you show your guests that they can peel the condiment wrapper off like a normal cupcake, otherwise, they will  inevitably try and squeeze it out like it's a jello shot!


2) "Zebra Cookies": Next I made my version of this Pinterest pink peanut butter kiss cookies. These did not  come out how I had hope for but they still tasted delicious. They are simple peanut butter blossoms, except I used a Hershey Hugs in the middle to tie it in with my zebra theme. I made my own colored sugar which was very pink in the container, but once baked it was hardly noticeable. Maybe next time I will put food coloring in the cookie dough itself to make more vibrant color!


3) Decorations: And what do-it-yourself-pretend-to-be-crafty baby shower would be complete without a diaper cake? However, my fabulous in-law Ray (Damn him!) made my sister-in-law a diaper cake before I could even buy the supplies I needed! And seriously, check this sucker out, it even shamed my unborn ideas for what a diaper cake should look like. There was no way I could outdo him. So instead, I admitted defeat and focused on small centerpieces. My husband helped me with the idea of  "basket" centerpieces. Each centerpiece has one blanket wrapped around the outside, two baby items inside (shampoo, lotion, powder etc.), three washcloths tied (taped) together for the handle and a hanging pacifier for a useful decoration.


I have so many ideas for my sisters shower now but that won't be until November/December time frame as she is due in January. We find out if it's a boy or girl this Friday and then I can go Pinterest crazy again with all of you! If you want instructions on how to make any of these decorations or desserts, please leave a comment below, e-mail us or head on over to our FB page! Thanks for looking!