Showing posts with label nails. Show all posts

Friday, July 27, 2012

Get Nailed: Mermaid Nails

CVS has a really amazing deal going on right now with their Revlon nail polishes. All Revlon polishes are on sale for $4.99 and you get $3 in ECB's back on each bottle (limit 6)! So you end up spending $30 and getting $18 back! As soon as I found out, I ran (not literally, I don't run) over to CVS to take full advantage of this offer, and I was immediately drawn to all of the blues !

My Purchase (L to R) 730 Royal, 340 Ocean, and 441 Radiant.

Time for a nail poish secret of mine. I have a love/hate relationship with blue nail polish. Someone in high school once told me that blue nail polish was "so juvenile", and that particular thought has seared its way into my memory and only recently could i get past it with the help of my sister in law (I make it sound so serious, huh?) Anyhow, I saw these polishes and immediately thought "Mermaid!"


I began with this look which was cute but it was missing something. What do mermaids have (besides fabulous hair, nice shells, and amazing singing voices of course)..SCALES! Once I decided I was going to attempt scales, I gathered a few complimentary colors and begin to place rows of dots in alternating colors, layering them on top of each other.


This is my final outcome. It would have been amazing if I had a dotting tool, but I still haven't gotten around to ordering one so this is what you get! Anyone else take advantage of the current CVS sale or do you have your own Mermaid Nails to show off? Leave us a comment below or visit our FB page !

Friday, June 22, 2012

Get Nailed: Fimo Fun

So I swore up and down that I wouldn't do any more "Get Nailed" posts until I dragged my pregnant butt out to the real world and bought some nail art tools. However, I remembered that Heather bought me some really fun fimo nail art (feathers & fruit) for Christmas and I haven't even used them yet! *Insert audible gasp here*


So this week, I finally got around to using the fruit fimo to do some fun Summer nails. I did french tips in glittery complimentary colors and used tweezers to gently place the fimo on my nails. Add a clear coat to seal the deal and viola ! Everytime I look at my nails that Wiggles song pops into my head.."Fruit salad, yummy yummy...." Once you hear it, you can never unhear it.


Have you ever tried fimo? Are there any brands or styles that you really like? You should check out how they make it, it's crazy! Post any questions, comments, or pictures below in the comment section or even on our FB page. 

Friday, June 15, 2012

Get Nailed: Reinforcement Rings


Here is a fun spin on the Half Moon Mani using those handy little reinforcement stickers once again!

You will need:
Clear base coat
Two contrasting colors
Clear top coat
Reinforcement Stickers


Instructions:
Paint nails with clear base coat, let dry.

Paint nails with "lighter color", or "non-textured" color" ( I used Certainly Cherry first and Purple Glitter second.) Remember to let dry completely or the stickers will adhere to the polish and rip off sections of it upon removal.


Once nails are COMPLETELY dry, place reinforcement stickers randomly on your nails depending on the shape you are looking for. (These clear ones are hard to see as I ran out of white ones but I assure you they are there.)


Paint over each sticker beginning at the rounded edge and brush outwards. Once the nails are painted with the second coat, remove stickers and you will have fun rounded, shapes and edges on your nails.


Let second coat dry and top with a clear and/or fast drying top coat and viola!

Friday, May 25, 2012

Get Nailed: Memorial Day Nails

Memorial Day is upon us and in the spirit of Patriotism why not jump on the American bandwagon and show my support of this holiday with my nails ? Okay, maybe I am exploiting Memorial Day for a reason to do my nails again, but hey it's all in good fun right ?

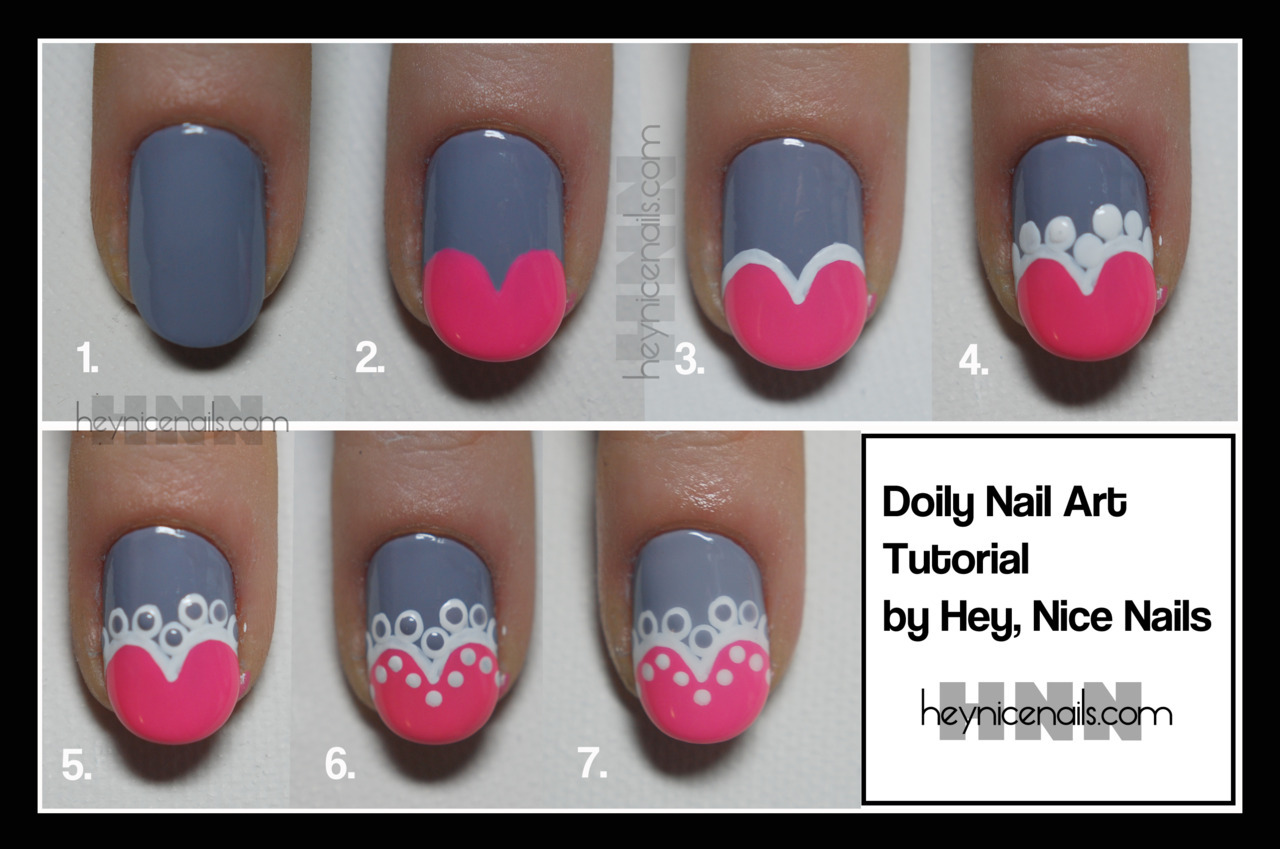
I saw the idea for Doily Nail Art at Hey, Nice Nails. The link is currently on page 5 of their blog but I am sure it will move as they add more nail art. If you are in the Long Beach, CA area, go check 'em out. They will do your nails and they also book events! Anyhow, here is a picture of my inspiration from Hey, Nice Nails.

Doily Nail Art Tutorial by Hey, Nice Nails
We were originally going to explain how to create this nail art look by exaggerating this tutorial by the lovely ladies at Polish You Pretty, but someone asked if we would make a tutorial so we decided to give it a go! Enjoy.
1. Apply a base color. The color in the photo is Essie Cocktail Bling
2. Using a contrasting color, paint two heart shaped lobes at the tip of the nail
3. Outline the top of the heart in white
4. Use a large sized dotting tool to make white circles around the top of the heart
5. With your base color and a smaller sized dotting tool, make small dots inside the larger white dots
6. Use the smaller dotting tool and make small white dots around the inside of the heart
7. Top everything off with a good thick layer to topcoat to seal in your artwork!

And here are my nails. They are not nearly as awesome as the tutorial however I had no tools. They are cute and remond me of flags, which I guess was the point right? Anyhow, this nail design has inspired me to go full nail salon on your ass and buy all the brushes and tools that I need to be fancy. So watch out for future episodes of Get Nailed!

Friday, May 18, 2012

Whoreders: Get Nailed: SPLAT !


Long time, no nail art. So sorry, but I have been extreeeeeemely lazy..errr...busy. Yes, busy, that's it. Anyhow, after browsing the Internet for nail art ideas, I got even lazier, and all my ambition went down the drain. Next time, I promise something new and exciting. This time, I decided to do splatter paint nails, it may not be new, but it is exciting! I mean come on, I named them SPLAT! nails.  

How did I do it you ask? It seriously is the easiest manicure in the world, even my two year old daughter could do it...maybe even better than I did, but we won't talk about that. Anyhow, all you do is put a dollop of polish where you want the main "SPLAT!" to be, and take a toothpick, bobby pin, or other pointy tool to drag out lines and splat marks! That's it..seriously. While the manicure isn't perfect, that's the genius behind it, you can be messy and still claim you wanted it to look that way !

Originally I was thinking of doing something along these lines, but I wanted something simpler with little to no clean up. Luckily, I found the amazing Nail Nerd and saw these super cute nails that she did. I used her idea but changed up the color combo and did not use a base coat.

If you try this or have done it in the past, please feel free to post pictures as we would love to see your mani's! If you have any other ideas or requests for future posts leave a comment here or on our FB!

Saturday, May 5, 2012

Serape Nails for Cinco de Mayo


It's that time of the year again... time to drink some tequila. Hopefully I don't fight a giant in a dark alley while in a dress and cute heels. That may or may not have happened to me before.

To celebrate, I decided to paint my nails like a serape! I hope they bring me warmth during the cold night.

Happy Cinco de Mayo! AY AY AY AYYY!

Thursday, April 19, 2012

Tuxedo Nails


It's been a while since I did a nail post, and what better reason to do one than to celebrate classy ladies? Zooey Deschanel sported these uber cute tuxedo print nails at the Golden Globes this year and I haven't had a fun yet classy event to rock them to.

However, my mom's Mumbley-Mumble Birthday is tomorrow and I wanted to do something fun on my nails to pay homage to her day of birth and the classy lady that she is. What better way to celebrate the lady who pushed me out of her va-jay-jay than Tuxedo Nails ? Excuse my (almost) bad language, but my Mommy is one down-ass, fancy...Lady ( I can't bring myself to type Bitc*and mom in the same sentence even at age 27)!

Is there anything that screams "CLASSY" more than painting little tuxedos on your nails?!? What's that you say? There are better ways, and classy people don't scream? Well eff you, this is as classy as I get!

That being said, here is my short, easy tutorial on how to do Tuxedo Nails:

Thursday, February 23, 2012

Get Nailed: Flower Power

Spring is almost here but the weather in Ventura, Ca is still chilly. So to prep myself for spring and the hopefully warm weather it brings, I've decided to do a floral print on my nails. I tried multiple times to paint different styles of flowers until I found one that I liked.


1.) To start with, paint your nails with a light color for the base polish. I used Sally Hansen Insta Dri in Blue Blast which seems to be discontinued. My sister in law found it on clearance at Target for only $3.24. Added bonus, if you use $1/1 MF coupon and $1/1 Target Coupon, it would only be $1.24, if you can still find it...


Friday, January 27, 2012

Get Nailed: The Tell-Tale Heart

Hello my pretties, this week's nails are inspired yet again by Valentines Day, but with a twist. My husband is a nurse (yeah, big whoop, wanna fight about it?) so this weeks nails are a nod to him as well.


1.) As always, prep nails by removing all polish, file down nails, and apply your base coat.


2.)Next pick a base color. I used an Urban Outfitters Polish in purple (even though it looks blue in the pic's) Let dry completely.


3.) Take a nail art brush, I used Milani Nail Art in White Canvas to make the EKG lines across my nails. The great thing about this is they don't have to be perfect, and there is no set pattern, so have fun with it!


4.) I chose my ring finger to draw my heart on because I'm corny and believe in "Vena Amoris".

For this, I used Milani Red Sparkle, which is quickly becoming one of my favorite polishes.


5.) Last but not least, I cleaned up the edges, applied my top coat, and voila!

Monday, January 9, 2012

Vanessa's Top Ten Budget Beauty Buys


Normally, these top ten lists come at the end of the year, but we Whoreders were a little busy wrapping presents and mixing cocktails. Whoops. I get some flack from people (Heatherrr!) for my fancy product lustin', but I'm also a big believer in budget buys (I AM!). I put together a list of my top ten favorites, all found at your local drugstore for under $20.

Ready? Here they are, in no particular order...


Wednesday, December 21, 2011

Get Nailed: This Little Light of Mine

There are many things I love about Christmas, but my absolute favorite thing is the lights! I love them so much that I went a little overboard and painted them on my nails! I was originally inspired by TheBeautyDepartment's fun and unique tutorial where Lauren uses actual string for her string of lights. I am not that ambitious, nor do I have string on hand, so I improvised.


1. Prep your nails with a good base coat. I got a new one when I took advantage of Milani's Cyber Monday sale (I went a little too far buying bought 26 polishes), and I love it so far. It really gives you a smooth canvas to work with!

2. Apply your base color. I went for a fun, holiday gold O.P.I., which happens to be a super rare polish that I found laying around Heather's desk.

3. Next, I took my new Nail Art Polish in Black (also by Milani of course), and made loops to resemble a string of Christmas lights (minus the lights).

4. I used three more of new Milani glitter polishes to dot on lights. You can use any color you want, just have fun with it!

5. Follow with a good top coat, and voila, you've got some fun(ky) Christmas nails!

Thursday, December 8, 2011

Get Nailed: Out Damn Spot!

So usually I write about how i did me some awesome nails, but this week, I'm writing how to undo these damn nails I did last week! Imagine my surprise went I went to remove my O.P.I. nail polish, and it didn't come off! What is this world coming to when you can't even count on O.P.I nail polish ?? ?Okay, maybe that was a bit dramatic, but I looked like I fingered the Hulk. Yeah, I said that, now deal with it.

I don't know if any of you have ever suffered the embarrassment of the dreaded "Nail Stain". It usually occurs when you don't use a base polish, use a really cheap polish, or a heavily pigmented polish. I never knew how to completely remove the polish stain, so I usually just painted over it, but this time I ventured  to my magic machine (the computer), and researched (aka Googled) the hell out of it.

I found the simplest way to remove the stain is this:

1) Remove as much as you possibly can with Nail Polish Remover.

2) Get  a cheap manicure kit, and go to town! No seriously, buff and smooth your nails with buffer stick (I may have made that name up) push back your cuticles and cut them with the cuticle pusher/cutter, which is super easy (even thought it looks scary). Next clip and/or file your nails as necessary. Lastly use the "Shine aka Side 2" of the "buffer stick" to polish your nails, and voila, the stains are gone! At most, this took me 10 minutes for both hands.
                                
    IT STARTED LIKE THIS
(DON'T JUDGE ME, I WASN'T DONE CLEANING THEM UP YET)

Friday, December 2, 2011

Get Nailed: That's a Wrap

Yay, December is finally here, and all I can think about is presents...err the presence of Christ. The Wisemen brought presents to Jesus (is it weird that I pronounce it Jesús in my head?) so maybe Christmas really is all about presents? Well whatever your take on presents and Christmas (or Hanukkah for that matter) is, I decided to paint my nails like a present in anticipation of the holidays.


What you will need:

Clear base coat
Solid Polish
Clear top coat
Nail Pen or Nail polish with an art brush
A gem or glitter polish


Wednesday, November 16, 2011

Get Nailed: *Special Edition* Movember


This week, I did a fun and easy pattern for my nails. I used Essie Mod Squad polish for the base, which I got for $2.99 on clearance at Ulta and have been dying to try! I used my Milani Black Magic polish (and a toothpick) to create the black polka dots and my Sally Hansen Nail Art Pen in Black to draw mustaches on my middle fingers. Mix it up any way you want, and make it you're own! 

Thursday, November 10, 2011

Get Nailed: By Dr. Seuss

My daughter and I have been reading Dr. Seuss beginner books lately and I came across a set I really like but hadn't read before; Put me In the Zoo, and it's sequel I Want to be Somebody New!. These are really fun books (that happen to be on sale) by Robert Lopshire and they teach you all about colors and other fun things. She seemed to really like the main character who is a yellow and red spotted leopard. Since we were already having mommy and me time by reading together, I figured we could paint our nails (and our faces lol)drawing inspiration from this kids book.